- VOX
- Data Protection
- NetBackup
- Speed Up Cloud Universal Share Backups with Accele...
- Subscribe to RSS Feed
- Mark Topic as New
- Mark Topic as Read
- Float this Topic for Current User
- Bookmark
- Subscribe
- Mute
- Printer Friendly Page
Speed Up Cloud Universal Share Backups with Accelerator
- Mark as New
- Bookmark
- Subscribe
- Mute
- Subscribe to RSS Feed
- Permalink
- Report Inappropriate Content
11-03-2023 08:54 AM
Delivered with the NetBackup Client software, users can now accelerate the backup and recovery of their Cloud Universal Shares!
Universal share accelerator doesn't provide the NFS or SMB service, but what it does provide is a direct file system mount point on the workload or client. The data goes directly to the cloud bucket and avoids traversing the storage server by saving you time!
How does it work?
- Ensure you have created your MSDP cloud LSU. These can be either AWS S3 or Azure Blobs.
- Install the client software on your workload or client and be sure to fill in the information regarding Universal Share Accelerator.
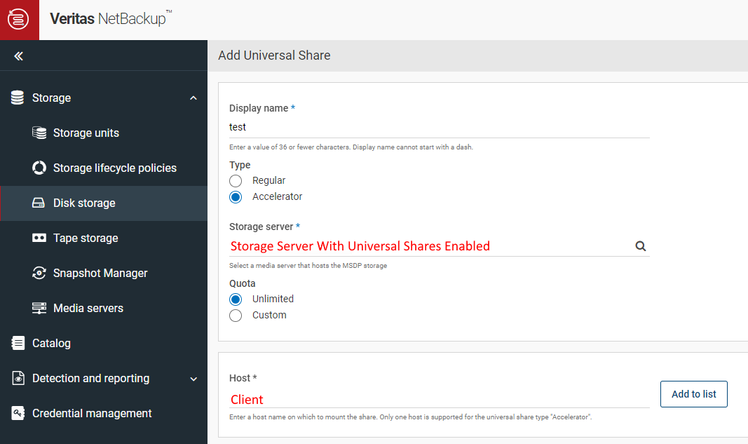
- Login to the NetBackup WebUI and go to Storage -> Disk Storage -> Universal Shares -> +Add
Display name: The share ID which will be used to mount on the NetBackup Client or workload.
Type: Choose Accelerator.
Storage server: The storage server host name.
Disk volume: The MSDP cloud disk volume.
Quota: Unlimited by default.
Hosts: The NetBackup Client hostname.
- Go to the client and configure the universal share accelerator.
/usr/openv/pdde/vpfs/bin/vpfs_accelerator.sh --config --storage-server=<storage server> --engine-host=<hostname> --mode=byo --storage-path=<path>
storage-server: The storage server name.
engine-host: Engine name of the cluster or storage server of the standalone server.
mode: Accelerator mode, it should be byo.
storage-path: List of local storage paths, comma separated with no spaces, and those paths should be pre-created.
- Next mount or create the Universal Share Accelerator.
/usr/openv/pdde/vpfs/bin/vpfs_accelerator.sh –create --share-id=<ID> --cloud-volume=<MSDP cloud disk volume>
share-id: Universal Share ID, which can be found in the section storage configuration section and tab Universal shares in the NetBackup WebUI.
cloud-volume: Cloud volume, it's the column 'Volume' in the tab Universal shares.
- Start up the Universal Share Accelerator.
/usr/openv/pdde/vpfs/bin/vpfs_accelerator.sh –start-all
- Go to Protection -> Policies -> +Add button.
Policy Name: Give the policy a name.
Policy Type: Choose Universal-Share.
Policy STU: Select the STU that maps to the cloud AWS S3 or Azure Blob.
- Click on the Schedules tab and create your backup schedule.
- Click on the Clients tab and add the Universal Share Accelerator clients’ name.
- Add what share you would like to backup.
- Perform your backup!
NetBackup enterprise tools makes backing up, maintaining, and recovering your data easier and more secure than ever!
- Mark as New
- Bookmark
- Subscribe
- Mute
- Subscribe to RSS Feed
- Permalink
- Report Inappropriate Content
11-07-2023 06:37 AM
Hi Neil,
Which NetBackup version is supporting this features?
- Mark as New
- Bookmark
- Subscribe
- Mute
- Subscribe to RSS Feed
- Permalink
- Report Inappropriate Content
11-07-2023 10:50 AM
Hi Mallek,
This new feature is available in NetBackup 10.3.
Thanks,
Neil


