- VOX
- VOX Knowledge Base
- Community Insights Knowledge Base
- Articles
- Installing ThinkVantage Technologies in Your Altir...
- Subscribe to RSS Feed
- Mark as New
- Mark as Read
- Bookmark
- Subscribe
- Printer Friendly Page
- Report Inappropriate Content
- Subscribe to RSS Feed
- Mark as New
- Mark as Read
- Bookmark
- Subscribe
- Printer Friendly Page
- Report Inappropriate Content
on 07-05-2007 12:17 PM
As described previously, the examples below use Altiris Task Server to deliver software packages of Lenovo TVTs.
This section assumes that the administrator has successfully:
- Installed Altiris Notification Server on a separate dedicated server
- Installed the Altiris Task Server component on the Altiris Notification Server
- Installed the Altiris Notification Server agent and Task Server subagents on various Lenovo desktops and notebooks to be managed
- Downloaded the Lenovo TVT packages to a local directory structure or repository on the local notification server.
Consult Altiris documentation (http://www.altiris.com/ support/ documentation.aspx) and/or Lenovo TVT documentation (http://www.pc.ibm.com/ us/ think/ thinkvantagetech/ downloads_support.html) as needed for help in completing these steps.
Creating a Lenovo TVT repository
- You will need to download the ThinkVantage Technologies that you want to upgrade or install from http://www.pc.ibm.com/ us/think/ ThinkVantagetech/ downloads_support.html.
For this example we've extracted the files to c:\TVTPackages.
Create a Deliver Software task
Altiris use packages and programs to delivery and install software. A package is simply the directory that includes the TVT module that will be delivered to the target system. A program is the action or installation command that will be used with the package. The program usually involves executing EXE, BAT, or other command-line options. The program also defines when and how these will run. The following steps and accompanying graphics were shown earlier in the Create Task section.
Before we can create a Deliver Software task, we need to define Software Delivery Packages in Altiris for the Lenovo TVT modules.
Create Software Delivery Packages for Lenovo TVT
You will need to create packages for each ThinkVantage Technology that will be distributed and installed remotely.
- On the Notification Server, open the Altiris Console 6.5 by clicking Start > All Programs > Altiris > Altiris Console 6.5.
- On the Altiris Console Menu, select Manage > Software.
- Expand Software Delivery Packages.
- Select the Windows folder.
- Right-click and then select New > Software Delivery Package.
- Click on the Package tab and then name the package. For this example, name the package Productivity Center Install Package.
Also enter names in the Description, Publisher, Language, and Version fields.
- The Package Source field should indicate "Access package from a local directory on the NS computer."
- To the right of the Package location field, select the browse folder icon
 and browse to the directory where you have placed the source files for Productivity Center. For our example, use C:\TVTpackages\Win\PRDCTR.
 - To define how the program will be launched and what command-line options will be used after the package is copied to the target system, click the Programs tab.
- Click New and then provide a name for the program.
Note: For our example, we are using Productivity Center Program.
- Click on the browse folder icon to the right of the command-line field to access the directory specified in the package.
- Select the command to be run and any startup options such as: "Setup.exe" /S
- Scroll down to view the additional options available.
- Click Apply and close the windows X.


Creating a Deliver Software Task
This section overviews how to create your own custom tasks in the Altiris Task Server. The Lenovo specific tasks explained throughout this white paper are already provided for you in the download link identified earlier in this document.
The instructions below are provided simply so you will understand how the Lenovo tasks were created and how easy it is to modify them or add your own.
To create a task in Altiris Task Server:
- On the Altiris Notification Server, click Start > Altiris > Altiris Console 6.5.
- In the Altiris 6.5 console menu bar, select Manage > Jobs
- Select Task Management > Tasks and Jobs, and then expand Client Tasks.
- Right-click on the previously created Lenovo TVT folder and then select New > Job/Task.
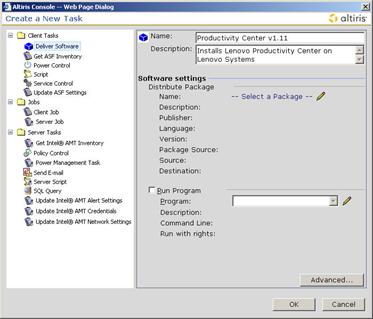
- Select Deliver Software.
- Enter a task name.
- To create or associate current Altiris packages or programs with the Delivery Software task, click the Select a Package link.
- In the Select a Package window you have the ability to create folders to organize packages as well as create the packages and programs themselves. The following steps demonstrate how to create a folder and package using the tasks already imported.
- Select New > Folder and then name the folder. In our example we have named it Lenovo TVT Packages.
- Select New > Package.
- Click the Package tab and then name the package. For this example, name the package Productivity Center Install Package. Also enter names in the Description, Publisher, Language, and Version fields.
- The Package source field should indicate "Access package from a local directory on the NS computer."
- To the right of the Package location field, select the browse folder icon and browse to the directory where you have placed the source files for Productivity Center. For our example we have used C:\TVTpackages\Win\PRDCTR.
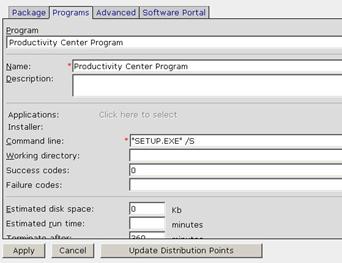
- To define how the program will be launched and what command-line options will be used after the package is copied to the target system, click the Programs tab.
- Click on New and then name the program. In our example we have named it Productivity Center Program.
- Click on the browse folder icon to the right of the command-line field to access the directory specified in the package.
- Select the command to be run and any startup options such as Setup.exe /S.
- Scroll down to view the additional options available.
- Click Apply and close the windows X.


Creating a collection
Collections are used in Altiris to group systems. Collections can be manually defined by what is referred to as a "static" collection. Or they can be automatic or dynamic in nature by establishing criteria that machines will automatically become part of the collection or be excluded from the collection.
The following steps are meant to give you an understanding of how to create collections for Lenovo systems to better target groups of systems that either meet or don't meet a specified criteria. Be aware that the following steps provide simple filtering. You can also use SQL statements for more advanced collections. For information about Altiris Notification Server documentation and creating collections, visit http://www.altiris.com/support/documentation.aspx.
- Click Start > All Programs > Altiris > Altiris Console 6.5.
- On the Altiris Console 6.5 menu bar, select View > Resources.
- Expand Collections.
- Left-click on Collections and then right-click and select New > Folder.
- Name the folder Lenovo ThinkVantage.
- Left-click on the newly created Lenovo ThinkVantage folder.
- Right-click and then select New > Collection.
- In the Name field type All Lenovo ThinkPad Computers.
- Left-click Query to expand the options below it.
- Select the Resource Type option.
- Click on No Filters or the pencil icon to the right.
- Select New Filter.
- In the table drop-down list, select Inv_Aex_HW_Serial_Number.
- In the field drop-down list, select System Manufacturer.
- Verify that the Operator drop-down is "=".
- Set the Value to Lenovo and then click OK.
Using Altiris Task Server to Call TVT Command-line Functions
Integration Examples