- VOX
- Technical Blogs
- Enterprise Data Services Community Blog
- Keeping Backup Exec 2012 Up To Date with LiveUpdat...
Keeping Backup Exec 2012 Up To Date with LiveUpdate
- Subscribe to RSS Feed
- Mark as New
- Mark as Read
- Bookmark
- Subscribe
- Printer Friendly Page
- Report Inappropriate Content
LiveUpdate's task is to keep Backup Exec fit, healthy, and up to date.
Times to run LiveUpdate:
For new installations:
When having issues with Backup Exec
Periodically during scheduled times
When upgrading Backup Exec:
- Run LiveUpdate following a new installation.
Note: Keep checking for LiveUpdates until LiveUpdate is completely up to date and there isn’t any updates left to install (Reboot as necessary).
- Run LiveUpdate before and after a Backup Exec upgrade.
- Schedule LiveUpdate at convenient times when there aren’t any jobs scheduled. The Backup Exec services are restarted during updates.
Note: Avoiding SQL Conflicts: When Backup Exec is installed use Backup Exec own inbuilt SQL instance (SQL Express) to host the Backup Exec database. Do not use a SQL instance that is used in production. When updates are ran LiveUpdate requires several restarts of the Backup Exec services including the SQL Backup Exec service.
Running LiveUpdate:
- Make sure no jobs are running
- In the Backup Exec Console click on the Backup Exec Button (located in the upper left corner)
- Select LiveUpdate.
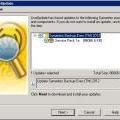
- In “Welcome to LiveUpdate” click ‘Next’ After searching for updates that are available the updates will be displayed when the list is expanded
- click Next to install.
Note: Find information about available Hotfixes and Service Packs at the Technical Support Website in the Downloads section.
Following Live Updates: Push-install the Agent for Windows to remote computers after you install any live
updates on the Media server to keep the remote computers updated to the same level.
Install the Agent for Windows on Remote Servers (Push Install from the Media Server)
2 Methods:
I .
- Go to Backup and Restore tab
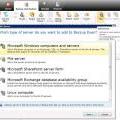
- Select Add (from the ribbon menu) - Select Microsoft Windows computer - click Next.
- Select 'Allow Backup Exec to establish a trust with the servers.' - click Next .
- Browse / Add a server name(s) - click Next.
- Select/Add a system logon account - click Next.
- Select "Upgrade the Symantec Backup Exec Agent for windows to the current version automatically" (if Agent for Windows is not installed/up to date).
Note: 'Restart the remote computer automatically after installing the Symantec Backup Exec Agent for Windows when a restart is required' can be selected in case a down time is planned for the target server(s).
- Click on Install
II.
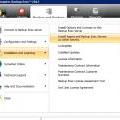
On the top left of the console click on the Backup Exec button :
- Go to Installation and Licensing - select Install Agents and Backup Exec Servers on Other Servers. On the Remote Computers section - select Add
- Choose Add a Single Computer (if remote agent needs to be installed on only one machine).
OR
- Choose Add Multiple Computers with the Same Settings (to select multiple servers for remote agent installation).
- On the Select the Remote Product screen - select Agent for Windows and click Next.
- Enter the Remote Computer name or select Browse Remote Computers to select a remote machine. Enter the Remote computer credentials (type the user name, password and domain of the account that has administrative rights on Server). Click Next.
- The destination location for Remote Agent install files can be changed under Destination Folder section if required. Click Next.
- On the Remote Agent Publishing screen: Check the box which says 'Enable remote agent to publish the IP address and name of the remote computer and the version of the Remote Agent to media server'.
- If the Media Server name or IP address (or both) isnt already there, click Add and enter then OK.
Click Next.
Note: You can check the checkbox to ‘Save the server list for future remote install sessions’.
Click Next when the screen shows ‘Ready to install the Agent for Windows’ beside the server name(s).
Click Install to begin the installation.
Local (manual) installation - When an automated (push) installation of Agent for Windows fails - steps to perform a local installation.
Two ways to do a local Installation:
2 Methods:
I .
- Copy the appropriate RAWS32 (32 bit) or RAWSX64 (64bit) and MSXML folder from the Media Server to the remote computers local drive.
- Note: The default path for the above mentioned folders is 'C:\Program Files\Symantec\Backup
- Exec\Agents'
- Go to the remote computer and open the RAWS32 or RAWSX64 directory which is copied on the remote server. Run the Setup.exe file.
Note: Turn off User Access Control (UAC) for Windows 2008, Vista or 7.
It is recommended to right-click on Setup.exe file and select 'Run as Administrator' to avoid any access issues during the installation process.
- Click Next on the Welcome screen.
Select Local Install and click Next.
Select 'Agent for Windows' - click Next.
Note: The destination location for Remote Agent install files can be changed if required by clicking on the 'Change' button.
On the Remote Agent publishing screen:
- Check the box which says 'Enable remote agent to publish the IP address and name of the remote computer and the version of the Remote Agent to media server'.
- Click Add and enter the Media Server name or IP address (or both) and press OK.
Click Next.
Click Install to begin the installation.
Important: After a manual Remote Agent for Windows install it is necessary to establish a trust with the Backup Exec Media server.
Note: The server needs to be added if it is not listed in the Servers list under Backup and Restore tab
- Open Backup Exec 2012 console - go to Backup and Restore tab.
- Locate and right-click on the desired server name.
- Select Establish trust.
OR
II.
Install from the Backup Exec 2012 DVD or other installation source.
- From the installation source run Browser.exe
- Select Install Products from the Home menu.
- Expand Backup Exec Agent for Windows and select Install.
- Click Next and select Local Install for the remote agent.
- The destination location for Remote Agent install files can be changed under the Destination Folder section if desired - click Next.
- Check the box which says 'Enable remote agent to publish the IP address and name of the remote computer and the version of the Remote Agent to media server'.
- Click Add and enter the Media Server name or IP address (or both) and press OK.
- Click Next to continue with the installation.
- Click Install to begin the installation.
Important: After a manual Remote Agent for Windows install it is necessary to establish a trust with the Backup Exec Media server.
Note: The server needs to be added if it is not listed in the Servers list under Backup and Restore tab
- Open Backup Exec 2012 console - go to Backup and Restore tab.
- Locate and right-click on the desired server name.
- Select Establish trust.
References:
You must be a registered user to add a comment. If you've already registered, sign in. Otherwise, register and sign in.
- 10 Minutes to Get Your Backup and Recovery Jobs Running Again After a Site Failure in Protection
- Understand, Plan and Rehearse Ransomware Resilience series - Strategy in Protection
- Backup Exec 22.1 Protects Microsoft Teams in Backup Exec
- How to Keep an Air-gap Copy of your Backup Data with Veritas Alta SaaS Protection in Protection
- Best Practices to Protect Hyper-V in Backup Exec
