How to configure Netbackup Liveupdate
NetBackup LiveUpdate provides a cross-platform, policy-driven method to distribute NetBackup Release Updates and Hotfix downloads to NetBackup hosts at version 6.5 and later. While configuring a new liveupdate server I faced few challenges and found guide related to it is not upto the mark. Hence decided to write down and article and explain various steps to novices like me.
NBU verson 7.6.0.1, various client servers (solaris, linux, windows) most of them at NBU version 6.5 to 7.1.0.3. I decided to use new vm machine as my NBU liveupdate server. I personally do not want to make master server as liveupdate server. I have marked (►) wherever I faced hurdle.
Login to new liveupdate server. open link https://licensing.symantec.com, then get software, enter your serial number and download 2 files -- NetBackup_7.6.0.1_LU_1of2.tar.gz and NetBackup_7.6.0.1_LU_2of2.tar.gz. ► do not concatenate them, download software 7zip, then unzip them individually. It will create 2 files .20131113_NetBackup_7.6.0.1_LU_1of2.tar and .20131113_NetBackup_7.6.0.1_LU_2of2.tar. Now you need to untar them. Result would be numerous compressed zip files in 2 different folders. copy all of them into a separate folder Liveupdate(name can be different as well). Total size would be 4.74GB, 76 files.
Next step is to configure webserver or IIS server. Contact your window SA to configure webserver. Once done go to start menu - administrative tools- server manager -roles- web server and check following services installed or not.
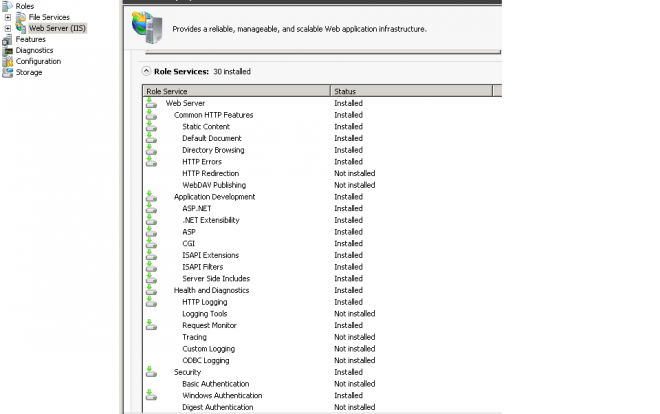
►Web Server
Common HTTP Features
Static Content
Default Document
Directory Browsing
HTTP Errors
Health and Diagnostics
HTTP Logging
Request Monitor
Security
Windows Authentication
Request Filtering
Performance
Static Content Compression
Management Tools
IIS Management
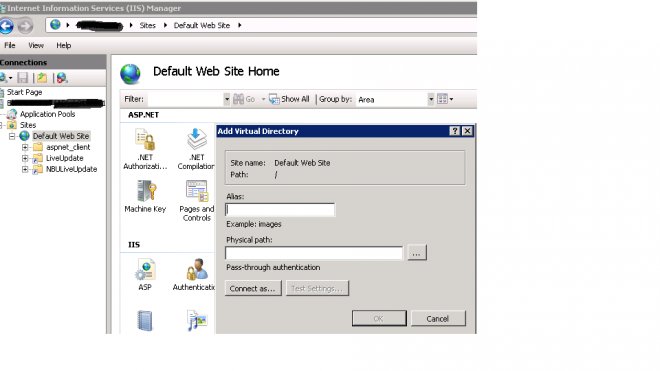
Open IIS manager. right-click Default Web Site, add Virtual Directory,enter "LiveUpdate" for Alias on Virtual Directory Alias dialog box, enter directory path.enable Read and Browse permissions on Virtual Directory Access Permissions dialog box.
►double click on mime type and .flg MIME type to the IIS web server.
► On right hand side , below option manage web site , click start.
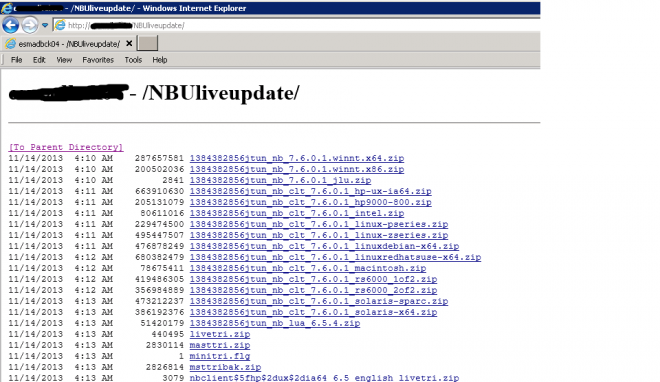
go to liveupdate server , open Internet explorer and type in path http://webservername.com/directoryname/ . You should be able to see all files.
Now webserver is ready. Create a live update policy from NBU GUI , on LiveUpdate Server Location add http://webservername.com/directoryname/
key points:
client server should have approx 2GB disk space free to push NBU liveupdate packages. NBU liveupdate server need not to have netbackup installed on it. create log folders (liveupdate and nblive) on client server at path C:\Program Files\VERITAS\NetBackup\logs.