- VOX
- Data Protection
- NetBackup
- Problem solved. Rebooked
- Subscribe to RSS Feed
- Mark Topic as New
- Mark Topic as Read
- Float this Topic for Current User
- Bookmark
- Subscribe
- Mute
- Printer Friendly Page
- Mark as New
- Bookmark
- Subscribe
- Mute
- Subscribe to RSS Feed
- Permalink
- Report Inappropriate Content
12-10-2013 04:32 AM
Solved! Go to Solution.
Accepted Solutions
- Mark as New
- Bookmark
- Subscribe
- Mute
- Subscribe to RSS Feed
- Permalink
- Report Inappropriate Content
12-12-2013 02:54 AM
- Mark as New
- Bookmark
- Subscribe
- Mute
- Subscribe to RSS Feed
- Permalink
- Report Inappropriate Content
12-10-2013 05:17 AM
You have 2 options.
Take the USB key and boot using it and it will install a fresh copy. Then configure as you please.
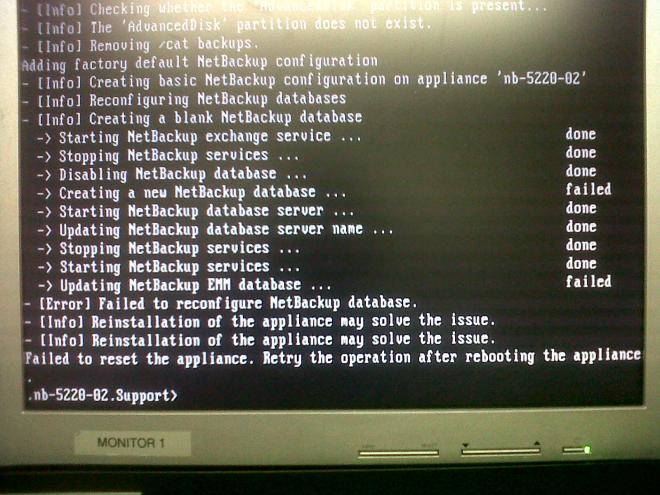
Figure out why it won't clean up the configuration. My guess would be something relating to name resolution. That is usually where it gets stuck. Check you host file entries and use DNS too. Make sure you can resolve the names you're using from the CLISH before starting.
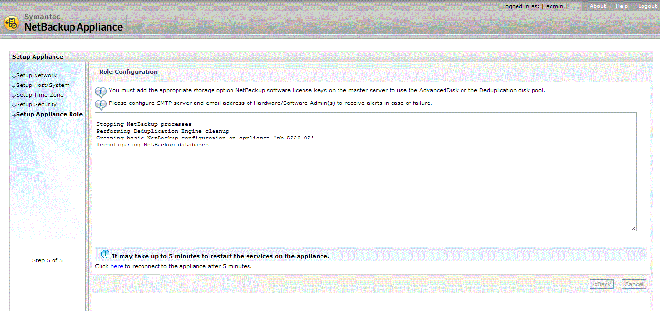
I never use the WEB interface to set it up cause it's, (cough, cough) cr@p! Do it from the CLISH and you'll see what its doing a lot quicker than through the GUI. If you open additional putty sessions to the appliance you can also tail the log files and follow the process of configuration as it happens.
Please share the configuration that you're trying to achieve as well. In other words, appliance being added to windows master, or appliance is the master, etc etc
- Mark as New
- Bookmark
- Subscribe
- Mute
- Subscribe to RSS Feed
- Permalink
- Report Inappropriate Content
12-10-2013 05:29 AM
- Mark as New
- Bookmark
- Subscribe
- Mute
- Subscribe to RSS Feed
- Permalink
- Report Inappropriate Content
12-10-2013 05:48 AM
Do you have an expansion disk shelf on your 5220? I am guessing that you do.
If so then please follow this procedure and see if it sorts it for you:
Shut it down, disconnect the disk shelf, put the USB stick into a port and power it on whilst connected via local monitor and keyboard or IPMI.
Press F6 to go into the boot menu
Now that the disk shelf has gone the boot order may have changed so F6 on boot – select Enter Setup and put the local disk back to the top of the list - this is named ICHx/ESB2
F10 to save and reboot then use F6 to go to the boot menu again and cursor down and select the Toshiba USB Stick to boot from.
Once the re-image screen comes up you have just a few seconds to cursor down and select to re-image the system, otherwise it will boot from the hard drive again.
Follow this through and after the initial section it reboots and sometimes comes up with a YAST screen which says it cannot access the Installation Media. (This is for a 2.5 image only, it doesn’t do this on 2.0.3)
Use the Tab key (arrows don’t usually work) to move across to “Skip” and press Enter.
It should then carry on with the installation – keep an eye on it for any errors.
If, when it has finished if you cannot login then something went wrong and you will need to start again.
When it is up configure it as a Master and then shut it down and plug the shelf back.
Power on the shelf and when all disks are up power on the header in - add the shelf via Manage - Storage - Add and then set the sizes as required – bearing in mind it will probably change the boot order again so F6 when it first boots to check it is still booting from ICHx
Hope this sorts it for you
- Mark as New
- Bookmark
- Subscribe
- Mute
- Subscribe to RSS Feed
- Permalink
- Report Inappropriate Content
12-10-2013 07:42 AM
- Mark as New
- Bookmark
- Subscribe
- Mute
- Subscribe to RSS Feed
- Permalink
- Report Inappropriate Content
12-10-2013 08:38 AM
OK - if you can get into the CLISH go to Manage - Licenses and add in valid NetBackup licenses plus remove the NFR key it comes with in the image - at least the base one - it may be that it will not configure NBU as it cannot fire up the services to do what it needs to do due to an expired license
Once added then try again - you should just need to go to Appliance and type Master for it to configure - but this will only work if it has a valid NBU license key added
- Mark as New
- Bookmark
- Subscribe
- Mute
- Subscribe to RSS Feed
- Permalink
- Report Inappropriate Content
12-12-2013 02:54 AM
- Error EC8F17B7 - UMI:V-281-3215-6071 - Veritas System Recovery on Windows 11 in System Recovery
- Could not get token for server 'MyservernameXXX' and user 'nbwebsvc'. Return code: 160 in NetBackup
- full backup failed (error :E00084C8) in Backup Exec
- HotAdd failed with lots of 6/41/89 errors in NetBackup
- Network connection broken (40) in NetBackup
